Your blog article can benefit greatly from the addition of an image. Adding a little flair to your post may be in order. To make the post easier to read, images can help break up long passages of text and increase the amount of white space. Add a thematic picture to your post early on to draw attention and set the tone for the content you'll be writing about.
Make a point or amplify your statement with images in your post.
Adding an image to your blog posts and pages is simple with WordPress. All you have to do is add an image block and then upload your image.
The ability to create a gallery within WordPress is pre-installed. It's a simple function with few options, but it does the job.
Wondering how to make side by side photos without the aid of a plugin? Here's how to make a WordPress image gallery.
How to make side by side photos
Using the Block Editor to Place Images Next to Each Other
Using the WordPress block editor is the quickest and easiest way to put your images side by side. The 'Gallery' block in the block editor lets you arrange photographs in columns and rows.
To open the content editor, you'll first need to create a new post or page or edit an existing one. Add a new block by clicking the (+) icon once you're within.
Once you've chosen the Gallery block, you'll need to place it on your page. In the Common Blocks area, you'll find the Gallery block, or you can use the search box to find it quickly.
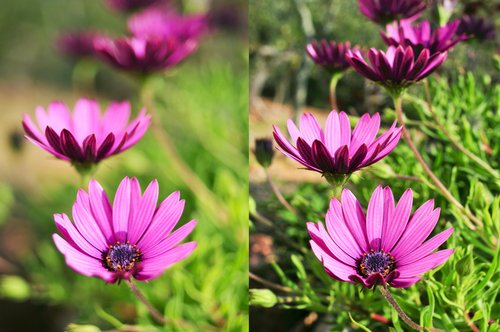
Adding photographs to your gallery block is now as simple as dragging and dropping them into the block or pressing the Upload button. Additionally, you have the option of using photos stored in your WordPress media library as an alternative. So, for example, if you add two photographs to our Gallery section. They've been placed side-by-side by WordPress.
Align left
First, upload your images to a post or page on WordPress. To insert photographs, simply pick them and then click the Add Media button in the editor's upper left corner. Insert photos into post by clicking the Insert into post button after you've selected them.
Each image can now be aligned by clicking on it and selecting Align left (you need to be in the Visual tab to do this). The Alignment option (under "Attachment Display Settings") in the Insert Media screen can be changed to "Left" before clicking the "Insert into post" button.
Using this feature, all of your images will be displayed side-by-side.
When you use one of the methods above, you will be able to put two photographs side-by-side for the first time in your life.
In WordPress, you may use a plugin to centre align two images side by side. It's possible that you'll want to display two photographs side by side in the centre of the page.
Keep reading to understand how to make side by side photos with the assistance of a plugin!
Using a plugin
As a rule of thumb, photos on a WordPress page or post are displayed according to their dimensions by default. The next image in the second row will be shown if the initial image's width and height are large enough.
WordPress gallery plugins are required if you're using the classic WordPress editor or if you'd like to develop more complicated galleries than the Gallery block.
Because Envira Gallery is the greatest WordPress gallery plugin, we recommend it to our customers.
You may want to upgrade to Envira's Pro version for more amazing tools like albums, image slideshows, and so on, but for this tutorial we'll use the free version.
Envira Gallery must be installed and activated first. Adding this to your WordPress editor will allow you to upload photos from your computer by clicking on the "Upload" button. You can also choose from the media library's collection of already posted images.
You can upload one photo at a time if you use the Upload button. However, if you press the Ctrl key on your keyboard, you can select and open multiple images.
Next, you'll need to upload the images you've selected. You can either use the 'Select Files' buttons or drag and drop the files into the upload box.
Image SEO

Remember to include SEO metadata when uploading images to your blog. An image cannot be interpreted by a search engine in the same way that your written material can be interpreted. With alt text, you increase the number of people who see your site.
For picture optimization, here are a few guidelines to keep in mind:
- Give your image a meaningful filename when you save it. Using the filename is a simple approach to include a term or topic in your blog article.
- An option to submit your SEO information is made available when you add an image to a post. Don't forget to include an additional text tag. Adding a keyword or phrase here is similar to doing so in the filename.
- It's important to keep your captions relevant to the image, so don't try to stuff keywords or concepts into them if they don't fit.
Making Use of Your Own Photographs
As noted above, if you are using your own images or photos, think about how you will edit, arrange, and add SEO data. Adding a watermark to your image may also be an option.
Adding copyright information to an image with a watermark is an easy way to show that the image belongs to you. In most image editing programmes, a watermark can be added.
Conclusion
Try to estimate how many photographs you will need in the future by considering how and why you use images in your postings when tackling the query of how to make side by side photos.