Plugin / Community Lite Video Chat
avchat.net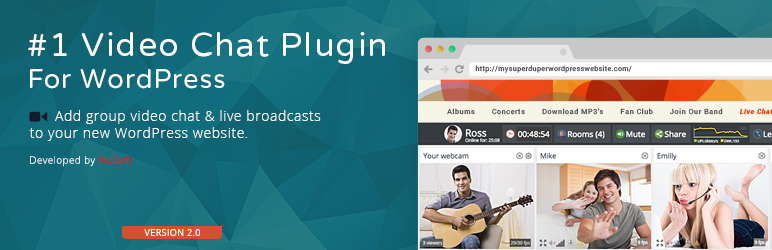
Installation
Installation
Part 1: Installing the Community Lite video chat plugin
- In your WordPress backend (admin area), go to Plugins -> Add New and search for AVChat. Click Install.
If you prefer to install it manually, download the plugin archive from above and upload its contents to your/wp-content/pluginsdirectory. - Activate it as you would do with any other plugin.
The plugin is now installed and activated but before the chat will show up on your website we still have to add the actual AVChat video chat software, connect it to a media server and place it in pages and blog posts. Let’s do it following the steps below!
Part 2: Installing AVChat 3.x (the actual chat software)
You will need the AVChat software and a license key (trial or purchased). You can purchase AVChat from avchat.net/buy-now but you can also get a 15 days free trial. After the order is made or a trial requested, you will receive an email with a link to your private client area from where you can download the AVChat software.
- Download AVChat from your private client area.
- Unzip and upload the contents of
Files to upload to your web siteto your new/wp-content/plugins/avchat-3folder. Don’t worry, no folder or file will be overwritten!
Part 3: Setting up the Media Server (Red5)
AVChat uses a media server to send audio, video and text between users. AVChat supports the top three media servers: Red5 (free and open source, version 0.8 and 1.0RC1), Wowza (commercial, $55/month, free trial) and AMS from Adobe (commercial, $4500, free trial).
To install any media server you need a cloud/VPS server with root ssh access. At DigitalOcean.com, VPS servers start at $5/month, use this link to get a $10 credit (2 months free).
Installing Red5 1.0.5 on your own VPS:
- Download Red5 1.0.5 for your platform from GitHub or Mega.co.nz.
- If your cloud/VPS server runs Linux, unzip the Red5 archive and upload its contents to
/opt/red5. If it runs Windows, install using the.exefile. - The AVChat archive downloaded in Part 2 contains a
Files to upload to your media server (Red5)folder. You’ll need to upload theavchat30folder inside it tored5/webapps. Your final folder tree should look like this:red5/webapps/avchat30. - Start Red5 by running
./start.shon Linux terminal/shell or runstart.baton Windows. You will find these files in the mainred5folder.
AVChat will use a connection string to know the media server it needs to connect to. Yours will be rtmp://my-media-server.com/avchat30/_definst_ where my-media-server.com is the server’s domain name or IP address.
Part 4: Finalizing installation
- Go to Community Lite -> Settings in your WordPress backend.
- In the Connection string field insert the connection string from Part 3 and click [Update Options] at the bottom.
- Now, to place the chat on your website, add the [chat-lite] short code anywhere in your WordPress pages or posts. Visiting these pages or posts will now bring up the AVChat 3 Video Chat.
- The first time you’ll login, you’ll be asked for a license key. You can find it in the private client area mentioned in Part 2.
That’s it! If you need any help, we’re here for you. Ask us on WordPress.org or <a href=‘http://discuss.avchat.net’>post in our forum.
For the Community PRO plugin’s installation instructions go to docs.avchat.net/wordpress-community-pro.
For the Pay Per Session plugin’s installation instructions go to docs.avchat.net/wordpress-pps.

Get Started With Free Trial
Explore the offer details: Discover it now


Ratings
Rating breakdown
Details Information
Version
First Released
Total Downloads
Wordpress Version
Tested up to:
Require PHP Version:
Tags
Contributors
Languages
The plugin hasn't been transalated in any language other than English.
DIRECTORY DISCLAIMER
The information provided in this THEME/PLUGIN DIRECTORY is made available for information purposes only, and intended to serve as a resource to enable visitors to select a relevant theme or plugin. wpSocket gives no warranty of any kind, express or implied with regard to the information, including without limitation any warranty that the particular theme or plugin that you select is qualified on your situation.
The information in the individual theme or plugin displayed in the Directory is provided by the owners and contributors themselves. wpSocket gives no warranty as to the accuracy of the information and will not be liable to you for any loss or damage suffered by you as a consequence of your reliance on the information.
Links to respective sites are offered to assist in accessing additional information. The links may be outdated or broken. Connect to outside sites at your own risk. The Theme/Plugin Directory does not endorse the content or accuracy of any listing or external website.
While information is made available, no guarantee is given that the details provided are correct, complete or up-to-date.
wpSocket is not related to the theme or plugin, and also not responsible and expressly disclaims all liability for, damages of any kind, arising out of the use, reference to, or reliance on, any information or business listed throughout our site.